.avif)


Recent Blogs
Stay updated with our latest blog posts.

Clean clogged dryer vent maintenance is one of the most important safety tasks every homeowner should master. Fire departments respond to an average of 15,970 home fires each year involving clothes dryers, with 92% attributed to dryers and 27% caused by lint buildup in vents.
Quick Steps to Clean a Clogged Dryer Vent:
A clogged dryer vent doesn't just slow down your laundry routine - it creates a serious fire hazard while driving up your energy bills. Lint buildup restricts airflow, forcing your dryer to work harder and run longer cycles.
When clothes start taking forever to dry or your dryer feels burning hot, these are warning signs that shouldn't be ignored. The good news? With the right tools and knowledge, you can safely clean your dryer vent yourself and restore both safety and efficiency to your home.
I'm Tony Lara, and through my years in HVAC work, I've seen how a simple task like learning to clean clogged dryer vent systems can prevent costly repairs and dangerous situations. My experience has taught me that regular maintenance is always better than emergency fixes.

When your dryer vent gets clogged, you're not just dealing with longer laundry days—you're facing real dangers. Lint is dry, fluffy, and incredibly flammable. When it builds up in your hot dryer vent, it creates a fire starter inside your home's walls.
The numbers from the National Fire Protection Agency (NFPA) paint a sobering picture. Every year, fire departments respond to about 15,970 home fires involving clothes dryers or washing machines. 92% of those fires come from dryers specifically, and 27% are caused by lint buildup in vents and lint traps.
But fire isn't the only concern when you need to clean clogged dryer vent systems. A blocked vent forces your dryer to work harder, running longer cycles to get clothes dry. All that extra time means higher energy bills.
When airflow is restricted, the motor and heating elements work overtime, wearing out much faster. Instead of lasting 10-15 years, your dryer might fail in just 5-7 years—an expensive consequence of neglected maintenance.
For homes with gas dryers, there's a silent threat: carbon monoxide poisoning. When exhaust can't escape through a clogged vent, dangerous gases can back up into your home. Carbon monoxide is colorless and odorless, making it impossible to detect without a monitor. This makes regular dryer vent maintenance a critical safety issue. You can learn more about protecting your family through proper Dryer Vent Cleaning for Home Safety.
Your dryer will tell you when something's wrong. These warning signs are your appliance's way of asking for help before a small problem becomes a big one.
Clothes coming out burning hot is a major red flag. When hot air can't escape, it builds up in the drum. If you can barely touch your freshly dried clothes, that's not normal.
The dryer itself feeling hot to the touch is another clear warning. If the surface is unusually hot during a cycle, heat is building up inside the machine instead of venting out.
Never ignore a burning smell from your laundry area. This often means lint is getting hot enough to scorch on the heating element or in the vent. This is your last warning before it becomes dangerous.
Longer drying times are a cry for help. When a 45-minute cycle now takes an hour and a half, or you're running loads twice, restricted airflow is the culprit.
Look for visible lint buildup around your dryer and laundry room. If you see lint on the floor, on the dryer, or around the exterior vent, the system is backing up.
Sometimes clothes come out covered in lint even with a clean lint trap. This happens when lint can't escape through the vent and gets redistributed onto your laundry.
A humid, steamy laundry room during drying means moisture isn't making it outside. Instead, it's building up in your home, which can lead to mold and mildew.
The easiest test is checking airflow at your exterior vent. While your dryer is running, go outside and feel the vent opening. You should feel a strong flow of warm air. If it's weak, you have a blockage.
When you notice these signs, take action. A little maintenance now can save you from emergency repairs, high energy bills, or a house fire.
Learning how to clean clogged dryer vent systems is a manageable DIY task that gives your dryer a chance to breathe again. The key is to take your time, follow safety precautions, and have the right tools. We'll walk you through each step.

Before you begin, gather your tools to make the job easier. You will need:
Optional tools include a leaf blower for stubborn clogs and fish tape to steer vents with many bends. Always wear protective gear and work in a well-ventilated area.
This step is straightforward if you follow proper safety procedures.

For electric dryers, unplug the unit. For gas dryers, turn off the gas supply valve behind the dryer. This is critical to prevent gas leaks.
Next, gently pull your dryer away from the wall to create enough space to work. Move slowly to avoid damaging the floor or the appliance.
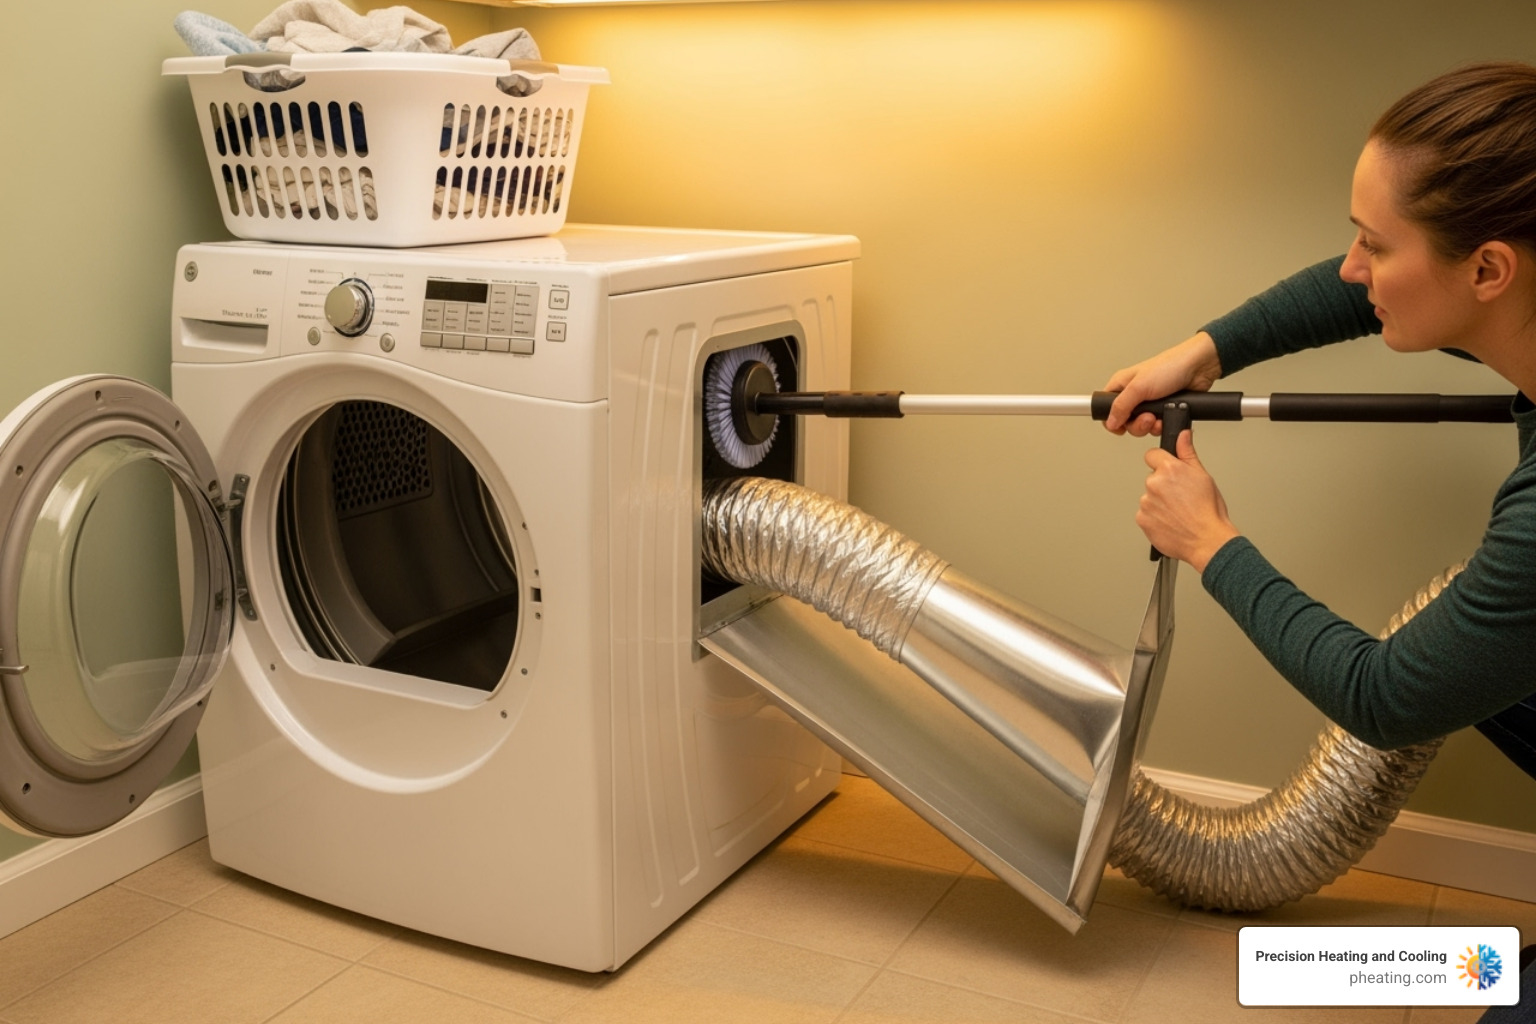
Behind the dryer, use a screwdriver to loosen the duct clamp, then carefully disconnect the duct from both the dryer and the wall. Don't be surprised if some lint escapes.
Now it's time to remove the built-up lint, which will greatly improve your dryer's performance.

Start by using your vacuum to remove loose lint from the dryer's exhaust port and the wall opening. This prevents pushing clumps deeper into the vent.
Next, use your brush kit. Assemble the rods and brush, then feed it into the ductwork. If using a drill attachment, set it to low speed and always rotate clockwise to prevent the rods from unscrewing inside the vent.
Push and pull gently while rotating the brush, adding more rod sections to reach the entire length of the vent. Pay extra attention to bends, where lint tends to collect. For more detailed guidance, check out our guide on how to Remove Lint from Dryer.
If you have a leaf blower, you can connect it to the duct opening to blast stubborn clogs toward the exterior vent.
Don't forget the exterior vent, a common spot for clogs, bird nests, and other debris.

Locate your exterior vent on an outside wall and inspect the vent flap to ensure it opens and closes freely. Lint buildup often causes these flaps to stick shut.
Remove any visible debris by hand, such as lint clumps or nesting materials.
Use your vacuum to clean the exterior vent cover and opening. Then, insert your brush kit from the outside, working inward to dislodge remaining lint. Cleaning from both ends ensures a thorough job.
A leaf blower is also effective from the outside. You can blast air in either direction to clear stubborn blockages.
After cleaning, make sure the vent flap moves freely to keep pests and cold air out.
This final step ensures everything is reconnected safely and works properly.
Before reconnecting, inspect your ductwork. If you have old flexible foil or plastic ducts, replace them with rigid metal ductwork. Flexible ducts are a fire hazard and collect lint easily.
Reattach the duct securely to the dryer and wall, making sure clamps are tight. Check for kinks that could restrict airflow. Use metal foil tape to seal joints on new sections.
Carefully push your dryer back into position without crushing the vent hose. Reconnect the power (and turn the gas supply back on for gas units).
Run an air-only cycle for 15-20 minutes to test the system and blow out any remaining lint. Go outside and check for strong, steady airflow from the exterior vent.
If everything checks out, congratulations! You've successfully learned to clean clogged dryer vent systems and made your home safer and more efficient.
Now that you've successfully learned to clean clogged dryer vent systems, let's talk about keeping them that way! Think of it like brushing your teeth – a little daily care prevents big problems down the road.
The absolute most important habit you can develop is cleaning your lint trap before every single load. I know it sounds repetitive, but this simple 30-second task catches about 75% of the lint before it even thinks about entering your vent system. It's your first and best line of defense against future clogs.
But here's something many homeowners don't realize: dryer sheets can be sneaky troublemakers. Those convenient fabric softeners leave behind a waxy residue that builds up on your lint screen over time. This invisible film can actually block airflow and reduce the screen's ability to catch lint effectively.
Every few months, give your lint screen a proper bath with warm, soapy water and a soft brush. You'll be amazed at how much cleaner it feels afterward! Just make sure it's completely dry before putting it back – nobody wants a soggy lint trap.
Regular inspection of your exterior vent opening is another smart habit. During your weekend yard work or when you're bringing in groceries, take a quick peek at that exterior vent. Look for lint buildup, debris, or any uninvited guests trying to make a home there. Birds love cozy dryer vents, but they're terrible tenants.
If you're still using those flexible foil or plastic dryer ducts, it's time for an upgrade. I've seen too many of these accordion-style ducts packed solid with lint – they're like lint magnets! Rigid or semi-rigid metal ductwork is smoother, collects less lint, and dramatically reduces fire risk. Your dryer will thank you with better performance.
When planning your laundry room layout, shorter vent runs with fewer bends mean fewer places for lint to accumulate. Every twist and turn in your ductwork creates a potential lint trap. If you're renovating or installing a new dryer, work with your contractor to create the most direct path possible to the outside.
Don't forget to vacuum around your dryer regularly too. Those dust bunnies hiding underneath aren't just unsightly – they can get sucked into your vent system during operation.
By making these simple practices part of your routine, you're not just preventing clogs – you're protecting your home and saving money on energy bills. It's all part of a comprehensive approach to home maintenance, which includes Regular Dryer Vent and Chimney Cleaning to keep your entire home running safely and efficiently.
You're not alone if you have questions about dryer vent maintenance! Over the years, I've heard these same concerns from countless homeowners who want to keep their families safe and their appliances running efficiently. Let me share the answers to the questions that come up most often.
Here's the golden rule: clean your dryer vent at least once a year. Mark it on your calendar right next to changing your smoke detector batteries - it's that important for your home's safety.
But life isn't always one-size-fits-all, is it? If your household runs multiple loads daily or you're blessed with furry family members who shed like it's their job, you'll want to clean clogged dryer vent systems every six months instead. Pet hair is sneaky - it combines with lint to create some seriously stubborn blockages.
The real test? Pay attention to those warning signs we talked about earlier. If your clothes are taking forever to dry or your dryer feels hot enough to cook an egg on, don't wait for your scheduled cleaning. Trust your instincts and clean it immediately, regardless of when you last tackled the job.
For homeowners in our service area, we've seen how regular maintenance prevents emergency calls. Our Dryer Vent Cleaning Santa Clara CA team often finds that consistent annual cleanings keep systems running smoothly for years.
Absolutely! A leaf blower can be surprisingly effective for dryer vent cleaning, and many homeowners are amazed at how well it works. There's something satisfying about watching years of lint come flying out like a gray snowstorm.
The key is using it correctly. Always blow from inside to outside - connect the leaf blower where your dryer ductwork meets the wall and push that lint toward the exterior vent. This ensures everything exits your home instead of getting redistributed inside the ductwork.
However, don't expect miracles from a leaf blower alone. While it's fantastic for loose lint and light debris, those really stubborn, compacted clogs that have been building for years? They often need the scrubbing action of a brush kit to break them free from the vent walls.
A word of warning: prepare for quite a show! The amount of lint that comes shooting out can look like a small blizzard in your backyard. Your neighbors might wonder if you're having some kind of lint party, so maybe give them a heads up first.
While I'm a big believer in DIY home maintenance, there are definitely times when calling in the pros is the smartest move. Your safety and peace of mind are worth more than the satisfaction of doing it yourself.
Long or complex vent runs are the first red flag. If your dryer vent snakes through your house for more than 20-25 feet or makes several sharp turns, standard DIY tools might not reach or steer those bends effectively. Lint loves to hide in those tricky spots.
Rooftop vents are another clear "call the professionals" situation. Unless you're comfortable working on ladders and roofs with proper safety equipment, this job is best left to experienced technicians who do this work regularly.
Sometimes you'll do everything right, follow all the steps perfectly, and still find your dryer taking forever to dry clothes. Persistent clogs after DIY cleaning often indicate deeper blockages that require specialized equipment to remove completely.
Damaged ductwork is a serious safety concern that needs professional attention. If you find crushed, torn, or deteriorating ducts during your inspection, don't try to patch them up yourself. Damaged vents are both inefficient and dangerous.
Finally, if you simply don't have the tools or feel uncomfortable tackling the job, there's absolutely no shame in calling for help. We'd rather see you make a safe choice than risk injury or incomplete cleaning.
For complex situations or when you want the peace of mind that comes with professional service, homeowners throughout the Bay Area trust our experienced team. We have the specialized tools and know-how to handle even the most challenging vent systems safely and thoroughly. Learn more about our comprehensive services at Dryer Vent Cleaning San Jose CA.
Taking the time to clean clogged dryer vent systems isn't just another item on your home maintenance checklist – it's one of the smartest investments you can make in your family's safety and your wallet's wellbeing. Every piece of lint you remove is a potential fire hazard eliminated, every cleared airway is money saved on your energy bills, and every thorough cleaning extends your dryer's lifespan.
Fire prevention is the most compelling reason to stay on top of this task. When you think about those NFPA statistics we shared earlier – nearly 16,000 dryer fires annually – it becomes clear that a few hours of maintenance can literally save your home. That's not being dramatic; that's being realistic about a very preventable danger.
The energy savings are equally impressive. A clean dryer vent allows your appliance to work efficiently, reducing drying times and cutting down on those monthly utility bills. When your dryer doesn't have to fight against restricted airflow, it uses significantly less energy to get the job done. Your clothes dry faster, your bills stay lower, and your carbon footprint shrinks.
Improved dryer performance is the cherry on top. There's something deeply satisfying about pulling warm, perfectly dry clothes from a dryer that's humming along at peak efficiency. No more running multiple cycles, no more damp towels, and definitely no more scorching hot laundry room that feels like a sauna.
We've walked you through the entire process because we believe every homeowner can master this essential skill. With the right tools and a little patience, you can tackle most dryer vent cleaning jobs yourself. It's empowering to know you're taking control of your home's safety and efficiency.
That said, we also know that some situations call for professional expertise. Complex vent runs, rooftop exits, persistent clogs, or simply the desire for complete peace of mind – these are all perfectly valid reasons to bring in the experts. For homeowners in the San Jose Bay Area and Central Valley, the experienced team at Precision Heating and Cooling has been handling these challenges for over two decades. We combine reliable service with competitive pricing to keep your home's systems running smoothly.
Don't let a clogged dryer vent become tomorrow's emergency. Whether you tackle it yourself or decide to call in the professionals, the important thing is taking action. Your home, your family, and your peace of mind deserve that level of care. Schedule your professional dryer vent cleaning service today if you'd prefer to leave it to the experts – we're here to help you breathe easier.

Leslie was amazing for her outstanding customer service skills with me the other day. Thanks to her help my air conditioner is now all set up. She answered all my questions and took away all my problems. Leslie broke it down step by step to set it up easier. Now thanks to her my air conditioner is working perfectly. I really appreciate it Leslie and I’ll be sure to ask for you if I ever come back.
I contacted Precision Heating and Cooling for my home's AC repair. They were punctual and very professional. Guillermo was very kind and thorough. I would highly recommend them!
I am writing to express my sincere appreciation for the excellent work performed by Pablo and Alejandro from Precision Heating and Cooling. Their commitment to quality and customer satisfaction is truly commendable. Awesome job guys!
I would like to extend my sincere gratitude to Alejandro for his exceptional hard work. His passion for helping others is evident, and he consistently goes above and beyond in his service. Alejandro's thorough cleaning of my fireplace has truly made a significant difference. His dedication and professionalism are greatly appreciated.
I was very impressed. Came at night (after 9pm) to fix our AC during the middle of a heat wave the day before a national holiday! Technician was very courteous and efficient, got the job done quickly. Will definitely call them again for any AC servicing I need!
Fast and efficient, arrived when scheduled for repairs and replacement parts were ordered and installed quickly. Techs were very friendly and professional. AC system works great now! I highly recommend their services if you need repairs. Tim