.avif)


Recent Blogs
Stay updated with our latest blog posts.

Water heater thermocouple replacement is often the solution when your pilot light won't stay lit, leaving you with cold water. Here's what you need to know:
Quick Answer: Water Heater Thermocouple Replacement Steps
Time needed: 1 hour or less | Difficulty: Beginner
If your gas water heater's pilot light keeps going out, you're likely dealing with a failed thermocouple—a small but critical safety device. A thermocouple acts as a sensor for your water heater. When the pilot light is on, it heats the thermocouple tip, which sends a tiny electrical signal to the gas valve, indicating it's safe for gas to flow. If the pilot goes out, the thermocouple cools, stops the signal, and shuts off the gas supply to prevent dangerous leaks.
The good news is that replacing a thermocouple is a beginner-level DIY project that usually takes an hour or less with basic tools. This straightforward repair can get your hot water flowing again quickly and may help you avoid a service call.

Quick water heater thermocouple replacement definitions:
If you're trying to light your pilot light and it dies the moment you release the pilot button, you're likely dealing with a failing thermocouple. The pilot light that won't stay lit is the classic sign of a thermocouple that needs replacement. This safety device's job is to sense the pilot flame's heat and signal the gas valve that it's safe to operate. When it fails, it can no longer perform this function correctly.

Beyond a stubborn pilot light, look at the flame itself. A healthy pilot flame should be a steady, bright blue and fully envelop the thermocouple tip. A weak, flickering, or yellow flame that barely touches the thermocouple is a red flag. You might also notice soot buildup or a clogged pilot tube, which can prevent the thermocouple from getting hot enough to work. For more guidance on these repairs, this guide to home maintenance offers helpful insights.
When a thermocouple fails, it sends clear signals. The most common is the pilot light extinguishing the moment you release the pilot button. The flame burns fine while the button is held down, but goes out immediately upon release.
This leads to the main symptom: no hot water. Without a pilot light, the main burner cannot ignite, leaving you with cold water.
Another sign is intermittent failure, where the pilot stays lit for hours or days before mysteriously going out. This indicates the thermocouple is unreliable and on its last legs.
Important: If you smell gas, stop everything immediately. A working thermocouple prevents gas leaks, so any gas odor indicates a serious problem. Evacuate the area and call your gas company or a professional. Do not attempt repairs if you smell gas.
For other water heater issues, check our guide on common water heater repair issues and solutions.
Before starting a water heater thermocouple replacement, consider other potential issues.
Investigating these possibilities can save time and ensure you're fixing the correct problem.
Replacing a thermocouple is a straightforward project if you follow safety protocols and have the right tools. This guide will walk you through the process.

Tools and Materials Needed:
Safety is paramount when working with gas appliances. Start by shutting off the gas supply to the water heater at the main shut-off valve. Also, turn the control knob on the gas control valve to the "OFF" position.
Wait at least five minutes for any residual gas to dissipate and for the unit to cool. Use this time to gather your tools and prepare your soapy water solution (a few drops of dish soap in water) for leak testing later.
While many water heaters use universal thermocouples, it's crucial to get the right part. The most important factor is length, with 18-inch and 24-inch being common sizes. A thermocouple that is too short won't reach, while a slightly longer one can have the excess carefully coiled. Avoid sharp bends or kinks.
The best way to ensure a match is to take the old thermocouple with you to the hardware store. This allows you to compare its length, thread size, and any special fittings like push-fit adapters. For more detailed information about water heater components, you can explore our resources on water heaters.
First, access the burner assembly by removing the outer and inner access panels at the bottom of the water heater. Keep track of the screws for reassembly.
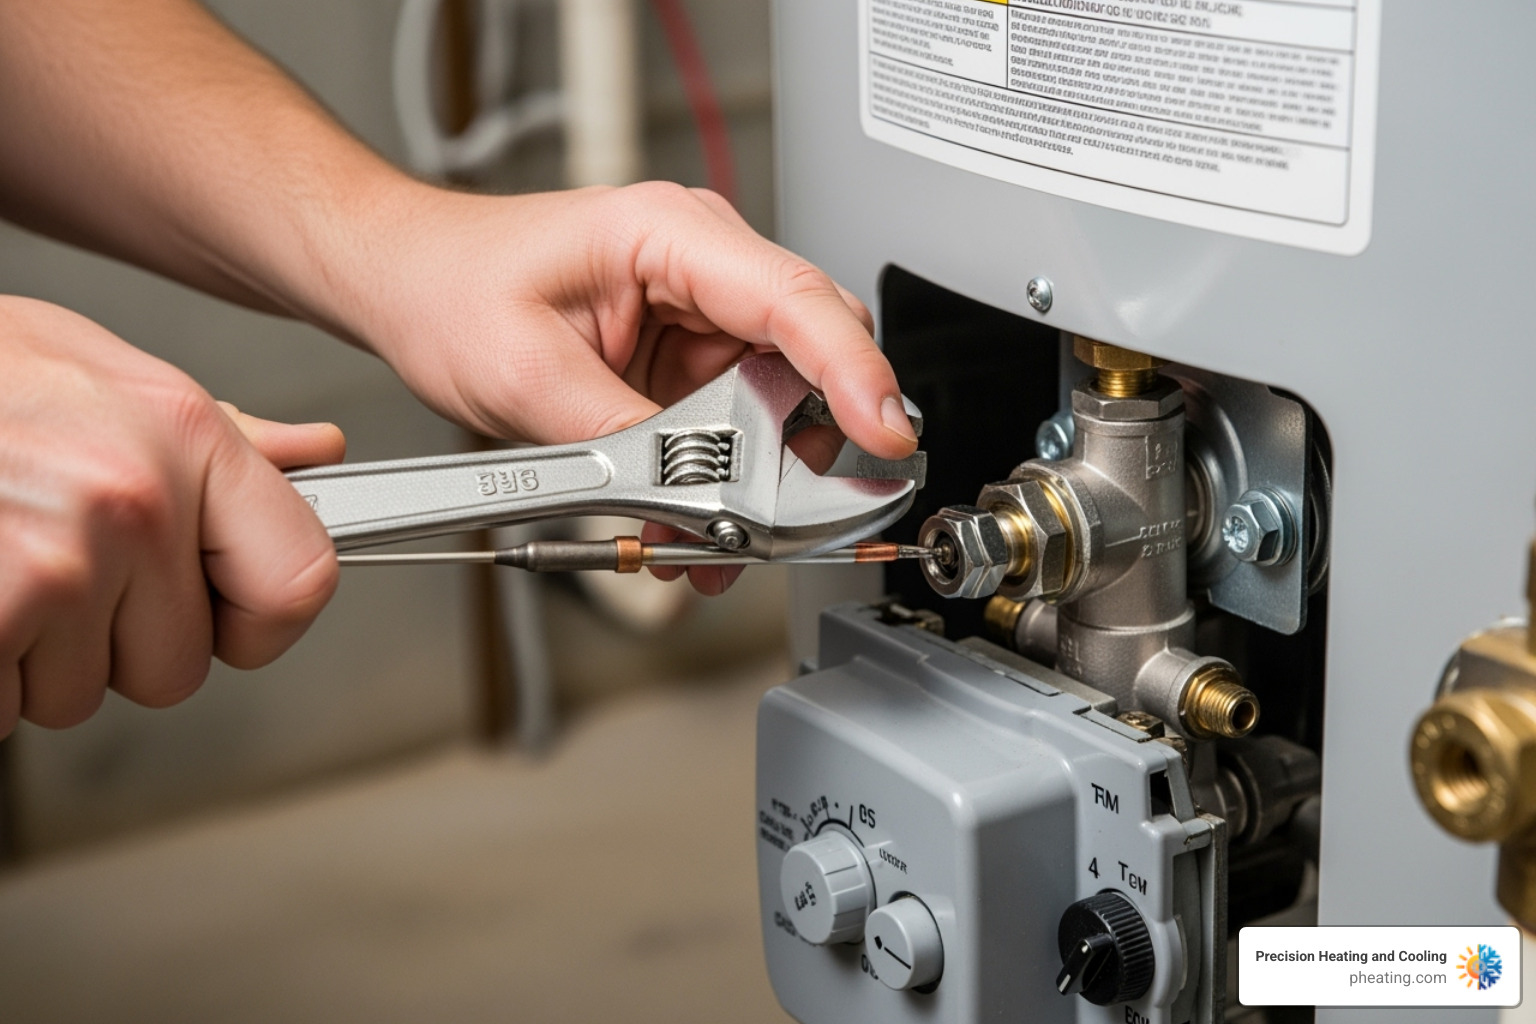
Inside, you will see the thermocouple, pilot gas line, and main burner gas line connected to the gas control valve. Use an adjustable wrench to disconnect these lines. Taking a photo beforehand can help with reassembly.

For easier access, remove the entire burner assembly from the chamber. It usually slides out after the gas lines are disconnected, though some models may have retaining screws. Once removed, you can clearly see the thermocouple tip held in a bracket near the pilot. Note its exact position, as the new one must be installed in the same spot.
Installation is the reverse of removal, with attention to detail. Secure the new thermocouple tip into the pilot bracket on the burner assembly, ensuring it sits directly in the pilot flame's path. If the new part is longer, gently coil the excess length without creating sharp bends.

Slide the burner assembly back into the water heater and secure it. Reconnect the gas lines to the control valve. To prevent cross-threading, hand-tighten each connection first. Then, use your wrench to gently snug the connections. They should be secure but not over-tightened, as this can damage the threads.
After installation, you must test your water heater thermocouple replacement to ensure it works safely and correctly. This phase confirms that the new part is communicating with the gas control valve and all connections are secure.

First, relight the pilot, following the specific instructions on your water heater's label. Typically, this involves turning the gas control knob to "PILOT," then pressing and holding the pilot button while lighting the flame.
Hold the pilot button down for 30 to 60 seconds to allow the new thermocouple to heat up and send its signal to the gas valve. Slowly release the button. If the pilot flame stays lit, the replacement was successful. If it goes out, repeat the process, as there may be air in the gas line.
Next, check for a stable flame. It should be a strong, steady blue flame that envelops the top of the thermocouple tip. Once the pilot is stable, turn the control knob to "ON." You should hear the main burner ignite if the thermostat is calling for heat.
Finally, perform a leak test with soapy water. Apply the solution to all gas connections you worked on. If you see growing bubbles, you have a gas leak. Immediately turn off the gas supply, re-tighten the connection, and test again.
If the pilot light still won't stay lit after replacement, check these common issues:
For complex issues beyond a simple thermocouple replacement, our team at Precision Heating and Cooling specializes in water heater repair and can diagnose problems that might stump even experienced DIYers.
While many homeowners can successfully complete a water heater thermocouple replacement, there are situations where calling a professional is the safest and smartest choice.
At Precision Heating and Cooling, we respect the DIY spirit but are always ready to step in when a job becomes too complex or hazardous. With two decades of experience in the San Jose Bay Area and Central Valley, our team can safely resolve any water heater issue, ensuring your home has reliable hot water.
Here are answers to common questions about thermocouples to help you with your water heater thermocouple replacement project.
A thermocouple is a safety sensor. It detects the pilot light's heat and generates a small electrical current that keeps the gas control valve open. If the pilot light goes out, the thermocouple cools, the current stops, and the valve shuts off the gas supply, preventing a dangerous leak.
Yes, sometimes cleaning is effective. You can gently clean a thermocouple with a soft cloth or fine-grit sandpaper to remove soot or carbon buildup that may be blocking heat. However, cleaning is often a temporary fix. If the part is old, visibly damaged, or if cleaning doesn't solve the problem, replacement is the recommended solution.
A thermocouple typically lasts up to 10 years. However, its lifespan can be shortened by factors like frequent cycling, high humidity, or debris in the burner chamber. If your water heater is over 10 years old and experiencing pilot light issues, a failing thermocouple is a common cause.
By completing a water heater thermocouple replacement, you've taken a key step toward restoring hot water to your home. This DIY project not only solves a common problem but also provides valuable insight into how your water heater operates safely.
Always remember the key safety points: shut off the gas supply before starting, allow time for gas to clear, and always perform a leak test on your connections. These steps are essential for a safe repair.
However, DIY isn't for everyone. If you encountered any issues like the smell of gas, felt uncomfortable with the process, or if the problem persists after your repair, it's time to call a professional. Sometimes, the issue is more complex than a single part, involving a faulty gas control valve or other system-wide problems, especially in older units.
For complex issues, persistent problems, or a full Water Heater Replacement in San Jose, CA, trust the experts at Precision Heating and Cooling. With over two decades of experience serving the San Jose Bay Area and Central Valley, we are here to ensure your home has safe and reliable hot water.

Leslie was amazing for her outstanding customer service skills with me the other day. Thanks to her help my air conditioner is now all set up. She answered all my questions and took away all my problems. Leslie broke it down step by step to set it up easier. Now thanks to her my air conditioner is working perfectly. I really appreciate it Leslie and I’ll be sure to ask for you if I ever come back.
I contacted Precision Heating and Cooling for my home's AC repair. They were punctual and very professional. Guillermo was very kind and thorough. I would highly recommend them!
I am writing to express my sincere appreciation for the excellent work performed by Pablo and Alejandro from Precision Heating and Cooling. Their commitment to quality and customer satisfaction is truly commendable. Awesome job guys!
I would like to extend my sincere gratitude to Alejandro for his exceptional hard work. His passion for helping others is evident, and he consistently goes above and beyond in his service. Alejandro's thorough cleaning of my fireplace has truly made a significant difference. His dedication and professionalism are greatly appreciated.
I was very impressed. Came at night (after 9pm) to fix our AC during the middle of a heat wave the day before a national holiday! Technician was very courteous and efficient, got the job done quickly. Will definitely call them again for any AC servicing I need!
Fast and efficient, arrived when scheduled for repairs and replacement parts were ordered and installed quickly. Techs were very friendly and professional. AC system works great now! I highly recommend their services if you need repairs. Tim